왜 나는 GCD를 썼을까?(Dispatch)
iOS에서 Thread 관리하기 1-3 (Dispatch)
이번 블로그는 Dispatch의 문서를 보도록 하겠습니다.
Dispatch
dispatch queue에게 작업을 주면 multicore에서 동시에 작업을 실행할 수 있게 만들어준다.
개요
multicore에서 동시에 작업을 실행할 수 있는 엄청난 일을 내가(apple님) 다 알아서 해줄 테니 잘 사용해라.
Topics
Managing Dispatch Queues
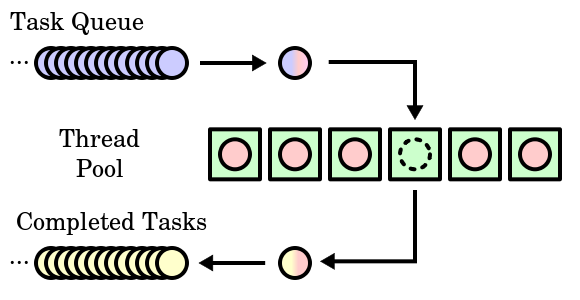
GCD는 FIFO queue를 관리하고 제공한다. 그리고 그 queue들은 block 형태의 작업을 등록할 수 있으며
등록된 작업은 알아서(시스템에게) 관리되는 thread pool 방식으로 실행된다.
thread pool 이란 thread를 여러개 만들어서 작업이 시작되면 thread에게 작업을 할당해 주는 방식이다.
너무 많이 만들어 놨다던가 만들어 놓은 thread가 골고루 일을 못하면 관리를 해줘야하는데 그걸 알아서 시스템이 해준다는 말이다.
Synchronous and Asynchronous Execution
sync: 모든게 멈추고 실행 구문 안에 있는 작업이 다 끝난 후 반환.
async: 실행 구문 메서드를 즉각 반환.
Serial and Concurrent Queues
FIFO 순서로 처리하되 serial은 한 개씩 순서대로 끝나고, concurrent는 순서에 상관없이 끝난다. 잘 와닿지 않다면 serial(single thread), concurrent(multi thread)라고 생각하면 되지만 concurrent 에 등록된 work item에 따라서 single thread가 될 수도 있다는 점을 명시하자.
System-Provided Queues
app을 실행하면 자동으로 main queue를 만든다. 이 queue는 serial queue이며 순차적으로 작동되고 DispatchQueue.main 이렇게 호출할 수 있다.
중요한점
sync 하게 main queue에게 작업을 시도하면 deadlock이 걸린다. 왜 걸릴까?

잘생각해보면

1. main queue는 serial이고
2. 현재 main thread에서 실행중인 코드가 있고
3. 그 밑에 main queue에 sync로 작업을 등록하는 코드가 있다고 치자(실제로는 안되지만)
4. 그러면 현재 실행중인 코드가 진행하면서 작업을 main queue에 등록하고
5. 그리고 등록된 작업을 하기 위해서 program이 멈추고
6. 현재 실행 중이었던 작업도 그럼 멈춘다.
7. 서로 언제 끝날까?
시스템은 main queue 외에도 global queue를 만드는데 이건 concurrent queue이며 multi thread를 지원한다. DispatchQueue.global(qos:) 이렇게 qos를 지정하여 사용하는 게 좋다.
위의 내용을 코드로 한번 보면 좀 더 이해하기 쉬울 수 있어서 아래 코드를 준비했습니다.
 let serialQueue1 = DispatchQueue(label: "io.github.lyhonghwa.serial1",
                                                qos: .default,
                                                autoreleaseFrequency: .inherit,
                                                target: nil)

                let serialQueue2 = DispatchQueue(label: "io.github.lyhonghwa.serial2",
                                                qos: .default,
                                                autoreleaseFrequency: .inherit,
                                                target: nil)

                let concurrentQueue1 = DispatchQueue(label: "io.github.lyhonghwa.concurrent1",
                                                    qos: .default,
                                                    attributes: .concurrent,
                                                    autoreleaseFrequency: .inherit,
                                                    target: nil)

                let concurrentQueue2 = DispatchQueue(label: "io.github.lyhonghwa.concurrent2",
                                                     qos: .default,
                                                     attributes: .concurrent,
                                                     autoreleaseFrequency: .inherit,
                                                     target: nil)
                 */

                //4가지 조합

                /*
                1. (serial + sync) (총 1개 thread)
                 순차적으로 실행이 되고 main thread에서 실행이 됨. queue가 마음대로 thread pool 방식으로 관리를 하는 것 같다.

                print("1")
                serialQueue1.sync {
                    print("\(Thread.current), 2")
                }
                serialQueue1.sync {
                    print("\(Thread.current), 3")
                }
                print("4")
                serialQueue2.sync {
                    print("\(Thread.current), 5")
                }
                serialQueue2.sync {
                    print("\(Thread.current), 6")
                }
                print("7")
                 */


                /*
                2. (serial + async) (총 2개 thread)
                 각각의 queue는 single thread를 가지고 task가 끝나면 다음 work item을 진행한다.
                 즉 1, 2번의 작업순서는 다를 수 있지만 각 queue에서 처리되는 work item은 순서가 같다.

                print("1")
                serialQueue1.async {
                    print("\(Thread.current), 2")
                }
                serialQueue1.async {
                    print("\(Thread.current), 3")
                }
                print("4")
                serialQueue2.async {
                    print("\(Thread.current), 5")
                }
                serialQueue2.async {
                    print("\(Thread.current), 6")
                }
                print("7")
                 */

                /*
                3. (concurrent + sync) (총 1개 thread)
                 순차적으로 실행이 되고 main thread에서 실행이됨. queue가 마음대로 thread pool방식으로 관리를 하는것같다.
                 공부하기 전에는 1번과 2번이 번갈아가면서 실행될 줄 알았으나 1번이 끝난뒤에 2번이 실행된다. 또한 main thread에서 실행이되서 UI가 굳어버렸다.
                 그 이유는 sync는 work item이 끝날때 까지 program은 기다리기 때문이다.

                print("1")
                concurrentQueue1.sync {
                    print("\(Thread.current), 2")
                }
                concurrentQueue1.sync {
                    for int in 0...100000 {
                        print("\(Thread.current), 1 for: \(int)")
                    }
                    print("\(Thread.current), 3")
                }
                print("4")
                concurrentQueue2.sync {
                    for int in 0...100000 {
                        print("\(Thread.current), 2 for: \(int)")
                    }
                    print("\(Thread.current), 5")
                }
                concurrentQueue2.sync {
                    print("\(Thread.current), 6")
                }
                print("7")
                 */


                /*
                4. (concurrent + async) (총 4개 thread)
                 각각의 queue는 multi thread를 가지고 작업당 하나의 thread를 가지고 작업을 실행한다.
                 각기 다른 순서대로 실행된다.

                print("1")
                concurrentQueue1.async {
                    print("\(Thread.current), 2")
                }
                concurrentQueue1.async {
                    print("\(Thread.current), 3")
                }
                print("4")
                concurrentQueue2.async {
                    print("\(Thread.current), 5")
                }
                concurrentQueue2.async {
                    print("\(Thread.current), 6")
                }
                print("7")
                 */

                /*
                 정리
                 queue: serial vs concurrent == single thread vs multi thread
                 work item: sync vs async == 모든게 멈추고 실행 구문안에 있는 작업이 다 끝난 후 반환 vs 실행 구문 메서드를 즉각 반환
                 */
코드를 안보실 수도 있으므로 정리를 해보겠습니다.
4가지 조합
1. (serial + sync) (총 1개 thread)
순차적으로 실행이 되고 main thread에서 실행이 됨. queue가 마음대로 thread pool 방식으로 관리를 하는 것 같다.
2. (serial + async) (총 2개 thread)
각각의 queue는 single thread를 가지고 task가 끝나면 다음 task를 진행한다.
즉 1, 2번의 작업순서는 다를 수 있지만 각 queue에서 처리되는 task의 순서가 같다.
3. (concurrent + sync) (총 1개 thread)
순차적으로 실행이 되고 main thread에서 실행이됨. queue가 마음대로 thread pool방식으로 관리를 하는것같다.
공부하기 전에는 1번과 2번이 번갈아가면서 실행될 줄 알았으나 1번이 끝난뒤에 2번이 실행된다. 또한 main thread에서 실행이되서 UI가 굳어버렸다.
그 이유는 sync는 work item이 끝날때 까지 program은 기다리기 때문이다.
4. (concurrent + async) (총 4개 thread)
각각의 queue는 multi thread를 가지고 작업당 하나의 thread를 가지고 작업을 실행한다.
각기 다른 순서대로 실행된다.
정리
queue: serial vs concurrent == single thread vs multi thread<br>
work item: sync vs async == 모든게 멈추고 실행 구문안에 있는 작업이 다 끝난 후 반환 vs 실행 구문 메서드를 즉각 반환
위에까지만 쓰려고 했으나 쓰고 있던 오픈소스가 궁금해서 CocoaAsyncSocket를 살펴보겠습니다.
CocoaAsyncSocket에서는 dispatch source를 많이 사용하는데요, 그래서 dispatch source 문서를 보겠습니다.
문서에 사용방법도 있어서 따로 사용해보지는 않겠습니다.
여기서부터는 objc를 봐야겠네요. 어느 정도 보실 수 있을 거라 생각하고 이해한 대로 설명하겠습니다.
Dispatch Sources
dispatch source로 low-level 이벤트에 대한 처리를 할 수 있다.
아래와 같은 기능을 제공한다.
Timer dispatch sources: 주기적으로 notification 발생

Signal dispatch sources: unix가 보내는 signal을 받을 수 있다.

Descriptor sources: file, socket 에 관련된 다양한 변경 사항을 받을수 있다.
    예를 들어 아래와 같은 상황을 알 수 있다.
    읽고 쓰기가 가능할 때,
    지워 지거나 이동되거나 이름이 변경되었을 때,
    메타 정보가 변경되었을 때

process dispatch sources: 프로세스와 관련된 이벤트를 받을 수 있다.
    예를 들어 아래와 같은 상황을 알 수 있다.
    종료될때,
    fork, exec 호출됬을 떄,
    process에 대한  signal이 도착했을 때

Mach port dispatch sources: Mach Kernel이 보내는 signal을 받을 수 있다.

Custom dispatch sources: 사용자가 정의한 이벤트가 발생될 때 알림을 받을 수 있다.
위에 상황에 맞는 dispatch source를 만들고 해당 이벤트가 발생되면 등록해 놓은 queue에 등록해 놓은 block이나 function을 실행시켜 준다.
중요한 점
block 을 dispatch queue에 수동으로 하나씩 등록했던 것과는 달리 dispatch source를 등록해 놓으면 cancel method를 할 때까지 등록된 block이나 function이 불려 그 안에서 다른 객체를 참조했다면 그 객체가 해제될 수 있으므로 조심해야 한다.

queue에 등록된 block이 백 로그(실행되기를 기다리는 상태) 되는 것을 방지하기 위해 새로운 이벤트와 이전 이벤트를 관리하는 기능이 있다.
예를 들어 이전 이벤트 + 새로운 이벤트로 하나의 이벤트를 만들어 줄 수도 있고 Signal dispatch sources의 경우는 최신 이벤트만 전달해준다.(그렇지만 총 signal의 수를 알려준다)
Creating Dispatch Sources
Dispatch Source를 만들기 위해서는 2가지가 필요하다.
-
dispatch_source 생성 (dispatch_source_create), descriptor-based dispatch source 만들때 descriptor 정보를 넣어줘야한다.
-
event 등록 (dispatch_source_set_event_handler, dispatch_source_set_timer…) dispatch_source_create해서 만들어진 dispatch_source는 resume을 해야 시작된다. 그 이유는 dispatch_source_create를 만들고 event를 등록하는데 그전에 이벤트가 일어나면 처리를 해야 하는데 그렇지 못하므로 suspend 상태의 dispatch_source가 반환되는 것 때문이다.
Writing and Installing an Event Handler
dispatch_source_set_event_handler(block), dispatch_source_set_event_handler_f(function pointer)
을 사용해서 이벤트가 발생 될경우 queue에 들어갈 handler를 지정해 줄 수 있다.
위에 설명했듯이 처리되지 않은 이벤트가 있고 그리고 또 이벤트가 들어온다면 병합 또는 최신것만 전달 될것이며
이미 queue에서 해당 이벤트에 대한 handler를 실행중이라면 실행중인 handler가 종료 된후에 queue에 등록한다.
dispatch_set_context를 통해 context받을 포인터 변수를 설정하면 function pointer로 설정된 function으로 data를 전달 받을 수 있지만
block은 handler block 내에서 dispatch_source_get_data 메서드를 사용해 data를 받을 수 있다.
해당 data를 직접적으로 변경하는것은 async로 일어나는 handler 때문에 하지 않는것을 추천한다.
    ispatch_source_t source = dispatch_source_create(DISPATCH_SOURCE_TYPE_READ,
                                     myDescriptor, 0, myQueue);
    dispatch_source_set_event_handler(source, ^{
       // Get some data from the source variable, which is captured
       // from the parent context.
       size_t estimated = dispatch_source_get_data(source);

       // Continue reading the descriptor...
    });
    dispatch_resume(source);
아래는 데이터를 받을수 있는 메서드 항목이다.
dispatch_source_get_handle
시스템에서 기본적으로 제공해주는 handler
아래에 있는 dispatch_source일 경우에 해당하는 값을 반환한다.
DISPATCH_SOURCE_TYPE_MACH_SEND: mach port (mach_port_t)
DISPATCH_SOURCE_TYPE_MACH_RECV: mach port (mach_port_t)
DISPATCH_SOURCE_TYPE_PROC: process identifier (pid_t)
DISPATCH_SOURCE_TYPE_READ: file descriptor (int)
DISPATCH_SOURCE_TYPE_SIGNAL: signal number (int)
DISPATCH_SOURCE_TYPE_VNODE: file descriptor (int)
Dispatch Source Memory Pressure Event Flags: file descriptor (int)
dispatch_source_get_data
아래에 있는 dispatch_source일 경우에 해당하는 값을 반환한다.(event에 대한 data)
DISPATCH_SOURCE_TYPE_DATA_ADD: application-defined data
DISPATCH_SOURCE_TYPE_DATA_OR: application-defined data
DISPATCH_SOURCE_TYPE_MACH_SEND: Dispatch Source Mach Send Event Flags
DISPATCH_SOURCE_TYPE_MACH_RECV: not applicable
DISPATCH_SOURCE_TYPE_PROC: Dispatch Source Process Event Flags
DISPATCH_SOURCE_TYPE_READ: 읽을 수 있는 bytes
DISPATCH_SOURCE_TYPE_SIGNAL: number of signals delivered since the last handler invocation
DISPATCH_SOURCE_TYPE_TIMER: 지난 호출로 부터 현재 까지 호출된 횟수
DISPATCH_SOURCE_TYPE_VNODE: Dispatch Source Vnode Event Flags
Dispatch Source Memory Pressure Event Flags: estimated buffer space available
dispatch_source_get_mask
아래에 있는 dispatch_source일 경우에 해당하는 비트 마스크 값을 반환한다.
DISPATCH_SOURCE_TYPE_MACH_SEND: Dispatch Source Mach Send Event Flags
DISPATCH_SOURCE_TYPE_PROC: Dispatch Source Process Event Flags
DISPATCH_SOURCE_TYPE_VNODE: Dispatch Source Vnode Event Flags
Installing a Cancellation Handler
dispatch_source_set_cancel_handler, dispatch_source_set_cancel_handler_f를 사용해 이벤트에 따른 handler 실행을 취소할 수 있다.
descriptor나 mach port의 이벤트는 다시 사용될 때 의도치 않은 버그가 생길 수도 있으니 꼭 취소시켜줘야 한다.
Changing the Target Queue
dispatch_set_target_queue를 사용해 queue를 변경할 수 있다.
즉시 적용은 되지 않고 바꾸기 전에 queue에 이벤트들이 남았다면 다 처리 후 바뀐다.
Associating Custom Data with a Dispatch Source
dispatch_set_context 메서드를 사용하여 dispatch source 사용자가 지정한 데이터와 연결할 수 있다.
dispatch source가 더 이상 필요하지 않다면 cancel handler를 사용해 사용자가 지정한 포인터를 해제해줘야 한다.
block을 사용해 handler를 구현한 경우에 포인터 변수를 안에서 참조할 경우 dispatch source 특성상 오랫동안 메모리에 있으므로 참조한 변수가 사라질 수도 있으니 copy나 retain을 해서 사용하는 것이 좋다.
그리고 cancel handler를 구현해 해당 데이터를 해제해야 한다.
Memory Management for Dispatch Sources
dispatch source는 dispatch queue와 마찬가지로 dispatch_retain 및 dispatch_release 메서드를 사용해서 reference count가 0이 된다면 자동으로 해제된다.
이 아래부터는 예제라서 굳이 적지 않겠습니다.
QOS는 Concurrency Programming Guide를 볼 떄 정리하겠습니다.
아 적다보니 DispatchGroup이 빠졌네요 가능한 빨리 공부해서 채워놓겠습니다.
느낀점
1. 간단하게 작성할 수 있다.
2. 유연하게 작성이 가능하다.(조합할 수 있는게 많다.)
3. 시스템 관련 이벤트를 받을 수 있다.(엄청난것 같다 최고!!!)
4. C 기반이라서 빠르다고 한다.(직접 느껴보지는 못했습니다)
잘못된 부분이 있다면 알려주시면 바로 수정하겠습니다.